Tuesday, October 24, 2017

Assignment #7: Arc Collector: Microclimate

Introduction:

GPS for mobile devices and tablets has come along since the technological advancements of the 21st Century. Recording data has become much faster and much more simple. This activity revolves around using a mobile device with the app ArcCollector, and it will teach students about alternative data collections. Groups of Students were sent to split up throughout the UWEC campus in order to collect the Temperature in Fahrenheit, Dew Point, Windchill, Wind speed, and Wind Direction. All data was record same day, October 24, 2007, within the the timeframe of 15:45-17:10.

Study Area:

The study area was mainly located on the UWEC campus. It contains parts of water street, the walk bridge, most of lower campus, and most of upper campus as well. The study area was split up to seven different sections. Zones 1 and 2 are on the North side of the Chippewa River, and Zones 3 through 7 are on the South side. Each group was assigned a specific section. This group was assigned to collect data in Section 5. As you can see in Figure 1, the study area is contains river as well as land cover. This will be apparent in the temperature range. The differences in elevation show a high variance for wind patterns.


Figure 1 displays the area in which student went around
and collected points. Groups of students were assigned to each

Methods:


In order to gather the data, The Kestrel 3000, a hand-held weather meter, was used to record the Temperature, Dew Point, Wind Chill, and Wind Speed (see Figure 3). One must note there is a potential for error based on variability.


Figure 2. Kestrel 3000 with
a field notebook for scale


The abbreviations, displayed on the Kestrel 3000, for the five variables measured were are shown in Figure 3.


Figure 4 shows the abbreviations that
the Kestrel 3000 uses.

Wind direction was recorded using a compass (Figure 4). By looking at objects flowing in the wind, or just the direction in which the breeze was hitting you, it was easy to tell which direction the wind was coming from thanks to the compass.


Figure 4. Compass

The first live shot of the Kestrel 3000 reading the Dew Point is shown in Figure 5.

Figure 5 shows the Dew Point of the first
point recorded in this groups section.


Results/Discussion:

The in order to display the results, three maps must be made. One shows the temperature, another shows the Dew Point, and the last one shows the Wind Chill, Speed, and Direction. The first map I created was the Temperature map. The tool I used for this was the IDW tool, and it can be found in ArcToolbox under Spatial Analysis tools, and then Interpolation. I used a stretched color scheme for the legend. As you can see in Figure 6, upper campus seems to be warmer then lower camps. However, the coldest temperatures were recorded on the bridge. There is a clear shortcoming on the temperature map with a value that reaches a low point of 9.8905 Fahrenheit. This was probably due to one of the groups missing a digit.


Figure 6. Temperature Map (Fahrenheit)

The second map I created shows the variation of the Dew Points around campus. Again, the IDW tool was used, but this time a classified color scheme was chosen for the legend. As depicted on Figure 7, the wettest areas seem to be in the woods, on the hill, and at southern parts of the campus. It also shows similar patterns to the Temperature map. There is also one shortcoming displayed on the map, this Group incorrectly entered a Dew Point value that was clearly lower then the other dew point values recorded. It is depicted as the only green area on the Dew Point map, and is due to this group forgetting to type in a digit.


Figure 7. Dew Point Map


The last map I created shows the Wind Speed, Wind Chill, and Wind Direction (See Figure 8), and it is a graduated symbol map. For the Wind Speed and Wind Direction, click on the data collection feature class. Then, choose the Symbology tab, and Graduated symbols under the Quantities option to display the Wind Speed. For Wind Direction, choose the Advanced options, and Rotate. From there, select WD in the drop down box, and leave the Rotation Style as Geographic (See Figure 7)The wind pattern map shows that the river and open areas that do not receive cover from the Hill are the coldest parts parts of campus. Whereas upper campus, and mainly the covered parts of lower campus are the coldest.


Figure 8. Rotate Window for Graduated Symbols
under Layer properties

Figure 9. Wind Patterns Map


Conclusions:

In conclusion, the ArcCollector app proved to be a very efficient way to instantly upload data from a mobile device onto ArcGIS. Not only is it quick, but it is very simple. Not to mention, it is a free app. ArcCollector absolutely addressed the goals for the assignment. By recording the data, and inputting it into a table, one had easy access to reviewing and utilizing data due to our mobile device. Overall, it is safe to say that the river plays a huge factor with temperature, wind, and dew point variations on the UWEC campus. All three maps show open areas near the river to be either colder or dryer then the on-campus areas covered by the hill and buildings. Although there were a few shortcomings, there was enough data recorded to help level out the damage done from the outliers, resulting in pretty solid maps.


Monday, October 23, 2017

Assignment #6: Using Survey 123 to gather survey data using your smart phone.

Introduction:

In this exercise an ESRI tutorial that utilizes Survey123 for ArcGIS will be performed, and data will be gathered from a mobile device. The tutorial involves making a survey that will help the homeowner association (HOA) assess how prepared the members from the community are for natural disasters like home fires and earthquakes. When the tutorial is completed, a survey will be published to ArcGIS online, so that other participants will be able to complete the survey using the web or mobile app. Then the survey data will be analyzed and shared.


Designing a Survey:

To begin, choose the Create New Survey button, and then click on Get Started using the web designer. Type the details of the Name, Tags, and Summary that are given in the Tutorial, and choose Create. The survey will consist of three sections including general participant information, the nine Fix-it prevention safety checks, and lastly the emergency asset inventory. By using the Add tab , various types of questions can be created (Figure 1).

Figure 1 shows all the question options that
can be found under the Add tab.

Participant Questions:


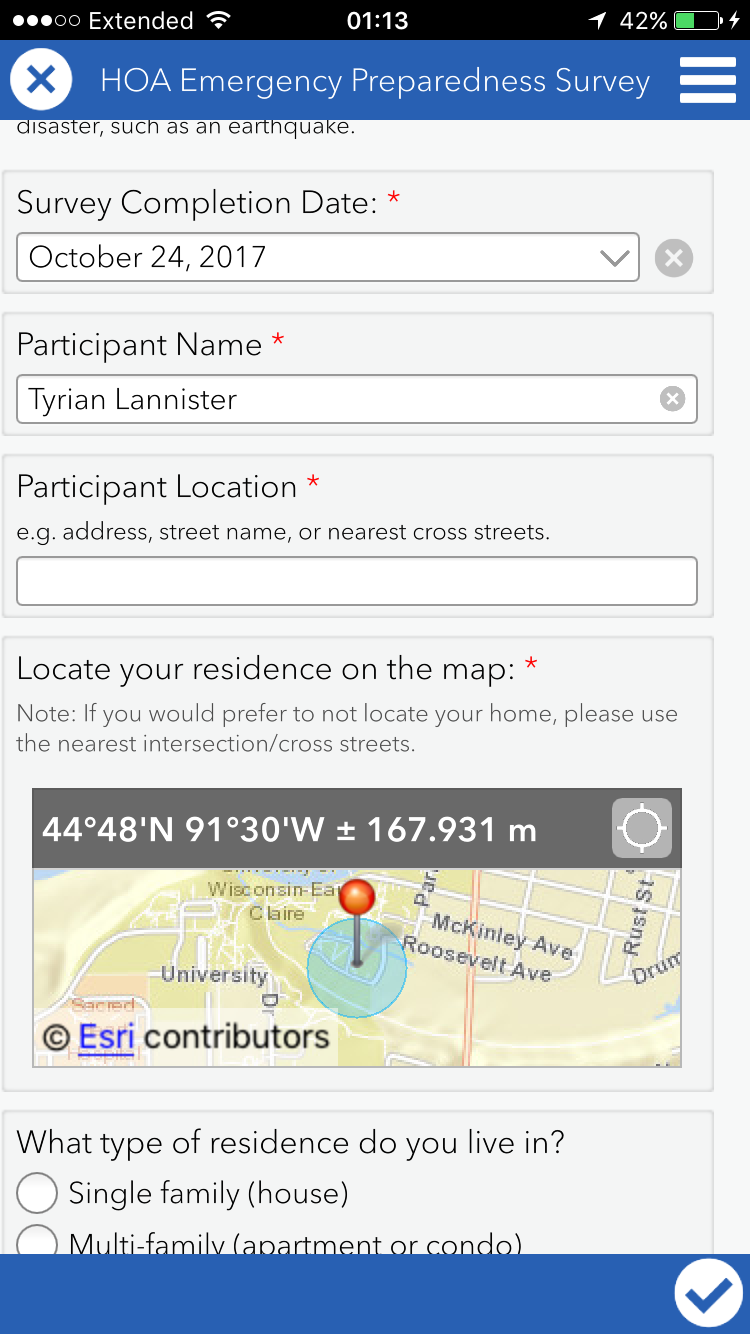
In the first section ten questions about the Participant's personal information are asked. After creating the general participant questions, add questions about the participant's residence. These will include the survey completion date, the participant's name, the participants location, the location of the residence on the map (shown on Figure 1), how many levels the home has, what year the residence was built, a picture of the residence, how many people live in the home, and what age range of people live in the house. The types of questions used are Date, Singleline Text, GeoPoint, Image, Number, and Multiple Choice.

Figure 2 displays question 4 which is GeoPoint question. For the Default Map, a good
 map to choose for this question is the OpenStreetMap because it pertains to address.

Question five will include a rule, so that question 6 is only asked if Single family (house) is chosen (Figure 3).

Figure 3 displays question 5 and 6. The icons circled in blue
show that the questions are linked with the rule.

9 Fix-it Safety Checks:

For the second part of the survey, the questions use the PAR approach as part of the RISK study. They will have yes or no answers in order to discover whether the participant has actually done the safety checks in their household in order to best be prepared for earthquakes and household fires. The first question is a single choice question that asks about the security of televisions in the house. Once it is submitted, duplicate it eight times and change the labels and hints of each of the according to the table in Figure 3.

Figure 4 displays seven safety check questions asked on the Survey
Once the safety check questions are completed, add a question to numbers: 1, 2, 7, and 8, which will only appear if the participant says Yes. Use the dropdown question under the add tab, for questions 1 and 2, create a rule for both of them, and the question will be the same. A number question will be created for safety check 7 and 8's rules, but they will be different questions.

Add Questions for an Inventory of Emergency Assets

The questions for the last part of the survey pertain to available resources and assets that could prove useful in emergency situations, and will be a big help to the HOA. This part uses the batch edit for multiple choice rules. The question types include single choice, multiple choice, and multiline text.


Figure 5 shows the Batch Edit box. Each line is an available choice
Publish the Survey

When finished with the Survey make sure to review it, and preview to make all questions are correct for both web and mobile devices. Once all questions and rules are correct, publish the survey. The new survey can now be viewed in the gallery under My Surveys.

Complete and submit the survey

Now that the survey is published, it can be shared with the rest of the ArcGIS members, so that they can access and complete it. Click the survey's thumbnail to see and analyze the overview page. It will say, The survey has no records yet under the description, because sample data must be collected. The survey needs at least 5 attempts.

Share the Survey

Go to the Collaborate tab to allow members of the personal organization to view the survey.

Open the Survey in a Web Browser

Complete the survey at least once with various choices to see the smart form validation and logic in Survey123. Submit when completed. (I completed three in the web)

Download the survey in the Survey123 field app

Once the app is download, sign in, and choose get surveys. Find your survey, and complete it a few times. (I completed it 3 times using the mobile app.)

Figure 6 shows the survey on the mobile device

Figure 7 shows the three options after the survey is completed
Analyze Survey Data:

Now that the data is collected, it is time to analyze the data by reviewing the results of the submitted surveys.


Analyze reports

Go to My Surveys to click on the survey. The overview tab will show the total records, participants, and when the data of submission.

Figure 8 shows the overview results

The analyze tab on the other hand shows the stats of each participant's answers as well as each question (Figures 9) . Depending on the question, you can see the results on a column graph (Figure 10), bar graph, pie graph, and even on a map (Figure 11). By clicking Set Visibility under the view settings box, you can choose which question answers can be viewed.

Figure 9 shows the results of when each survey was submitted

Figure 10 shows a bar graph of one of the questions as well as the percentage each occurs.
 Each question had a bar graph similar to the this one varying on the amount of choices per question.

Figure 11 shows the map view of the question answers.

Display individual survey responses

The data tab will show all the results on an interactive map (Figure 12). The table below that shows all of the responses collected during the survey for each participant. If you can click on specific survey, it allows easier access to the results, and shows the house image. You can also export any of the data in a CSV, shapefile, or file geodatabase.
Figure 12 shows the location of each participant, and the survey results for each participant.
By choosing map viewer, one can get higher quality visual survey results on the web map. For example, you can see a heat map shown in Figure 13.
Figure 13 shows the heat map of the survey. The areas that are more yellow show
a higher concentration of completed surveys, whereas the areas that are more blue
show lower concentration.


Share Your Survey Data

Now that you have formed a survey, got results, and analyzed the results, the next step is to share those results. By using a configurable template on ArcGIS online, you will be able to make a web app displaying the survey results with map pop-ups.

Create a map with custom pop-ups

To create a web map displaying the survey data, open map viewer. In the contents pane, click Configure Pop-up, display A custom attribute display, and configure attributes.  Make sure all questions are on display and are unable to be edited then hit okay. The pop-ups will show up when you choose a location that a survey was taken at (Figure 14). Save the map as told in the tutorial.

Figure 14 displays a pop-up window for one of the survey results

Create a web app

The last step is to click the Share button in the map viewer, and click Create a Web App. In this lesson the the web app will have a configurable template with a basic viewer. Then change the settings and display according to the tutorial.

Figure 15 shows the final web app


Conclusion:

The final online interactive map can be accessed at:
https://learn.arcgis.com/en/projects/get-started-with-survey123/lessons/create-a-survey.htm

The maps shows that the highest concentration of survey results are in the Midwest area, specifically the Eau Claire area. However their were a couple outliers in Texas and Montana. Survey123 makes it easy to see these data patterns. 50 percent of households were single family (house). Most of the houses were built in around 14 years apart varying from 1945 to 2013. 5 of the houses had a resident of 18-60 years old. 66 percent of houses had Televisions secured, but only 33 percent had the computers secured. Overall for the safety checks more households had yes than no on all except safety check #9. Only half of the houses had a current evacuation plan.

Survey123 is a great application, and considerably applicable to almost anything. By conducting more and more experiments like these it will be easier to prevent mistakes and hazards for houses in the future. Almost all the results can be shown on a graph or a map which makes it easy to decipher. As far as crowd surfing household preparedness for natural disasters, the application couldn't get much better. One of the few flaws is the public access to people's personal information.

References:

https://learn.arcgis.com/en/projects/get-started-with-survey123/lessons/create-a-survey.htm

Monday, October 16, 2017

Assignment #5: Using a Bluetooth GPS with your IOs device

Introduction:

Technology has advanced a rapid rates over the past few decades. GPS units are now compatible with with mobile, laptop, and tablet devices to use as an interface tool. This lab revolves around connecting the Bad Elf GPS with an IOS device using bluetooth. By doing so, the GPS unit makes the GCs more accurate. On top of that, it eliminates the need for WiFi. There are several applications compatible with Bad Elf via an IOS device including:
  • Collector for ArcGIS
  • Survey 123
  • GIS4Mobile
  • Theodolite HD
  • Fog of World
  • Gaia GPS Classic
  • Galileo Offline Maps
ArcCollector for GIS was a great app that allows you to download offline maps, and collect data improving the efficiency and accuracy of the GIS. It allows you to work on maps that you have uploaded onto your ESRI account so you can create track logs, look for places and features on the map, and even attach photos to GCP's on the map.


Figure 1 displays two screenshots of the Arc Collector application.


Survey 123 was also a very useful app. You can also download maps offline as well as any forms that have been shared with you. It enables you to add Interval, Ratio, Ordinal, and Nominal data to any location as needed.


Figure 2 shows two screenshots of the Survey123 application


GIS4Mobile is an application allowing the user to synchronize GIS data with data that they collected field data in a very user-friendly way. You can practically do anything with data including inspections, documentation, data-collection, an registration. Plus, it allows you to connect with GIS enterprise and and fieldwork all free of charge.

Theodolite is an application used for hiking and off road traveling. It has a multi-function viewfiedner for Ipads and gives live visuals of contour lines, roads, trails, and other feature classes. It also allows you to Geotag photos as well to showcase your experience. It is used for all sorts of outdoor activities, by all sorts of fields workers and sportsman.

The Fog of World is a fun web applications, and the only one that is actually considered a game. As you explore areas it removes fogged out areas near the vicinity and gives out badges urging the user to travel and explore more around the whole world.

The GAIA GPS classic is another interesting application that is used for planning trips for hiking in the woods and doing other off road traveling. Again this application allows you to download offline maps so that you aren't navigating through the woods and get lost because you can't get signal. It also tracks your route so you can go back the way you came.

Galileo Offline Maps can download maps to anywhere you want. It allows syncing of Geodata, GPS recording, and when finished sharing the Geodata as well.

Methods:

For this lab the class was split into different groups, and told to make a track using the Bad Elf and logging it on the GPS. After making sure the Iphone was paired with the correct number on the Bad Elf, each group was sent in separate directions to crate there own paths. Once the path was completed, the groups came back to the lab, and uploaded from the Bad Elf app via the Iphone device this group used.


Figure 1. Displays the route this Group walked shown in Google Earth. 

After getting hands on experience with the Bad Elf App, students were instructed to install a few of the other applications that are also compatible with the Bad Elf GPSs.

For the last part of the assignment, Professor Hupy demonstrated the Galileo Offline Maps. It enables the user to download map tiles for campus and the surrounding area as well as the Wisconsin map in the Application. It uses cached maps which store copies of map images at different scales so that image services run faster. It also uses an external GPS, like the Bad Elf, to make mapping more accurate. The best part about the app is that it records your personal GPS track, so that you can go back and see all the different locations you've been to.

Discussion/Conclusion:

This assignment did a great job of showing how effective Geospatial applications are with IOS devices. Most of the applications were very simple to use, especially for anyone who has background knowledge in Geography. For Geographers out in the real world, they can see data instantly uploaded to their work rather than having to record data from a standard GPS or in a field notebook then later enter manually on to the computer,  There is no doubt that applications like this will continue to get better and better as technology continues to advance at the rate it has been over the last 5 or 10 years.

Sources:

https://itunes.apple.com/us/app/collector-for-arcgis/id589674237?mt=8

https://itunes.apple.com/us/app/survey123-for-arcgis/id993015031?mt=8

Field Activity #4: Development of a Field Navigation Map

Introduction:

This field activity revolves around the creation of a field navigation map in preparation for another navigation activity taking place later in the semester. By using a given Priory Area, two maps are to be created. The first uses a UTM projection, and the second uses a geographic coordinate system with decimal degrees.

Methods

UTM Map

For the UTM map, use a measured grid. A good interval for the grid is 50 meters. Make the primary font size 8 and black, and the secondary font size 5 and grey. Make sure to make the grid line black so it is easier to see.

Figure 1

To make the contour lines more legible, use the contour spatial analysis tool. To switch the contour interval from 2 feet to 5 or 10 feet. This map will use 5 feet intervals.

Figure 2 displays the contour (spatial analysis) tool window


To make things even less messy one can simply clip all contour lines within the study area. To do this search for clip input the contour line feature class, then drag Navigation boundaries in for clip features, and name the output feature class whatever you.

Figure 3 shows the Clip tool window

Decimal Degrees Map

The second map needs to be in Decimal Degrees. Use a graticule grid for this map.

Figure 4 shows the Grids selection window

Switch the intervals for parallels and meridians to 2 seconds.

Figure 5 shows the create a graticle window.

Go into the Grid Label Properties and switch the label type to Decimal Degrees, then under Fraction values, click the check box and choose 3-4 decimal places.

Figure 6 shows the Grid Label Properties

Results/Discussion

The Navigation maps developed in this assignment use the same given boundary and Digital elevation models. The two created in this assignment use UTM and Decimal degree grids. Both use elevation contours, with 5 feet intervals which spaces things out and makes the map easier to interpret. It goes to show that although maps may vary with different techniques and features, a nearly identical outcome can still be achieved.

UTM Map:


Figure 7 displays the UTM grid map.

Decimal Degrees Map:


Figure 8 displays the Decimal Degrees Grid Map


Sources

Priory Geodatabase, UWEC Geography Department., Dr. Joseph Hupy


Monday, October 9, 2017

Field Activity #3: Evaluation of UAS Platforms and GPS Units for Ground Control

Introduction:

On September 30th, 2017, the Geo-spatial Field Methods class went to the Litchfield Mine to record  ground control points using high and low quality GPS, and to gather aerial imagery using different types of UAS platforms. The end goal is to compare the gathered data in order to find out which of the equipment is the most accurate. The types of equipment used at the mine to collect the ground control points were: a Bad Elf GPS, a Mobile Device GPS, a Topcon HiPer HR, Topcon HiPer SR, Arrrow GPS Markers, and Ground Control Point markers. The UAS equipment used to gather aerial imagery included: the DJI Phantom 3 Pro , Sensefly Ebee, M600 Pro w/Zenmuse X5, M600 Pro with GeoSnap PPK, and a C-Astral Bramor w/ Sony a6000. On top of that the class also got to see two types of Toposurvey equipment which were the Topcon Total Station and the Topcon Robotic Station

The whole class started out the day walking around the study area and placing different control points. The two class sections were split up into three different groups. Each group was given a Bad Elf GPS and a Topcon Survey GPS unit. Each group then collected the latitude and longitude coordinates using the two GPS units as well as a mobile device GPS. Once all the GCPs were collected the class moved to an open area to which the UAS drones were deployed.

Study Area

The Litchfield Mine was southwest of Phillips hall, and roughly ten minutes away. This mine is an aggregate mine right along the west side of the Chippewa River, and is hundreds of feet deep of fluvial deposition river rock from the meandering river. The elevation was relatively the same throughout the study area, but there was many piles of the river rock spread out. The Mine was surrounded by Forests to the South and to the West.

Figure 1: Map of Study Area

Methods:

High quality Ground Control Points are needed in order for High quality UAS surveys. Professor Hupy instructed the students to lay down sixteen separate Ground Control Points spaced out equally throughout the Litchfield mine, making sure none of them were close enough to be overlap another. Once the GCPs were laid out, we gathered the coordinates using three different GPS units. The UAS equipment's will then use the GCPs to gather centimeter accurate aerial imagery. The following content will give an in-depth analysis of the different GPS, Toposurvey, and UAS equipment that was used during the field outing.

Topcon HiPer

When recording data with this survey GPS, you must wait until the control panel says fixed. If it is at 0% and yellow, stop it and start over. Once it completes collecting thirty coordinates, hit store than save. This will help give you real time accuracy of just two centimeters. However it is capable of achieving sub-centimeter accuracy.

Arrow GPS Markers

The GPS markers were explained by PJ Kirkpatrick, who flies drones for a company called Terra Viglis. These instruments are a 2 by 2 foam solar GCP. They communicate with satellites, and the propeller gets the accuracy around 2-6 centimeters. They are 500 dollars per unit. The limitations are that once you press the button to collect the point, it collects until it is done not allowing any real time access. The advantages to this GPS are that it is water proof, very accurate, durable, and light. On top of that the points talk to each other which helps get even more accurate points. This instrument is also good for topography, 3D-models, and measuring amounts of dirt.

DJI Phantom 3 Pro

The first drone the class got to see was a rotary-wing drone called the DJI Phantom 3 Pro, flown by PJ Kirkpatrick. It costs roughly 30,000 dollars. This drone includes a MOCO feature which is short for Minimal Obstacle Collision Avoidance, allowing for the safest flight path. It is a manual drone that records data from an average of 250 feet. PJ used an app called drone deploy to control the Phantom. The phantom has roughly 30 minutes of battery life, and can fly continuously. By the end of the flight path, it had taken 222 photos of the study area.

Figure 2 displays the DJI Phantom 3 Pro

Video 1 shows the Phantom take off
Sensefly Ebee

The first of the two fixed-wing drones was called the Sensefly Ebee flown by Josh Nave. This drone can cover a lot more ground on one battery and fly for 59 minutes, but due to military law, it can not be in the sky for more than an hour. It also has a autonomous flight plan, a multi spectral and thermal camera, and the prop is designed to breakaway. Josh holds the drone in the air, until it is ready for take off. It then marks the launch point as the home point, and will return home if the wind speed gets too high or the GPS signal is bad. The disadvantages are that it needs a run way when its about to land, and it is not the best for recording data of small spaces. Josh has an insurance package called Always-on which is a two-year, two-replacements within 48 hours of the crash.


Figure 3 displays Josh Nave prepping the Sensefly Ebee


M600 Pro w/ GeoSnap Pro

The second multi-rotar drone was the M600 Pro. This is a reliable drone that is separate from the platform. It has a built in GPS, and if you take the sim card out you can see the overlay quality right after. It also has built in RTK (Real Time Kinematic) which communicates with the GPS on the ground to fly withing centimeter accuracy.

C-Astrol Bramor w/ Sony a600

The second fixed-wing drone was brought by Peter Menet who owns a company called Menet Aero. This drone goes for 70,000 dollars on the market. It has a long time flight time, which can exceed the legal 59 minutes of flight time. It also has a parachute that is deployed when it is ready to land.

Video 2 shows the C-Astrol Bramor takeoff in Slow Motion

Topcon Robotic Total Station

This Toposurvey instrument gathers information by shooting lasers that reflect to create 3-D models. It is great at reading angular distance and can measure specific dimensions. It scans point about once every couple seconds, and costs 22,000 dollars.


Results/Discussion:

The Geospatial Field Methods class used various GPS units and UAS equipment to gather Ground Control Points and aerial imagery. For the GPSs, we know that the mobile device will be the most inaccurate, the Bad Elf's were the second most accurate, and the Topcons were definitely the most accurate. However, we still need to map the collected to coordinates out to get the physical proof. Each group entered their coordinates from the Bad Elf and Mobile Device into a Microsoft Excel Spreadsheets as seen in Figure 4 and 5. The class is still waiting for the centimeter accurate Topcons GPS results.

Figure 4 displays the coordinates recorded by the Bad Elf GPS

Figure 5 displays the coordinates recorded by the mobile device GPS
As far as the drones go, the fixed-wings a much higher crashing rate than the rotary wings. However, the fixed-wings tended to have a longer battery life for more flight time, and collected photos at a much more effective rate.